> ## Documentation Index
> Fetch the complete documentation index at: https://docs.keywordsai.co/llms.txt
> Use this file to discover all available pages before exploring further.
# Create a prompt
> A complete guide to create, deploy, and use prompts in your codebase.
## What is prompt management?
Prompt management helps you create, version, share, and deploy prompt templates easily. Instead of hardcoding prompts in your application, you can manage them centrally, collaborate with your team, and monitor their performance.
## Why use prompt management?
Instead of hardcoding prompts in your application, reference them by ID.
```python Without prompt theme={"system"}
response = client.chat.completions.create(
model="gpt-4o-mini",
messages=[
{
"role": "system",
"content": "You are a helpful customer support agent for TechCorp."
},
{
"role": "user",
"content": f"Customer {customer_name} is asking about {issue_type}"
}
]
)
```
```python With prompt theme={"system"}
response = client.chat.completions.create(
model="gpt-4o-mini",
messages=[{"role": "user", "content": "placeholder"}],
extra_body={
"prompt": {
"prompt_id": "042f5f",
"variables": {
"customer_name": "John",
"issue_type": "billing"
},
"override": True
}
}
)
```
## Use prompt management
### 1. Get your Keywords AI API key
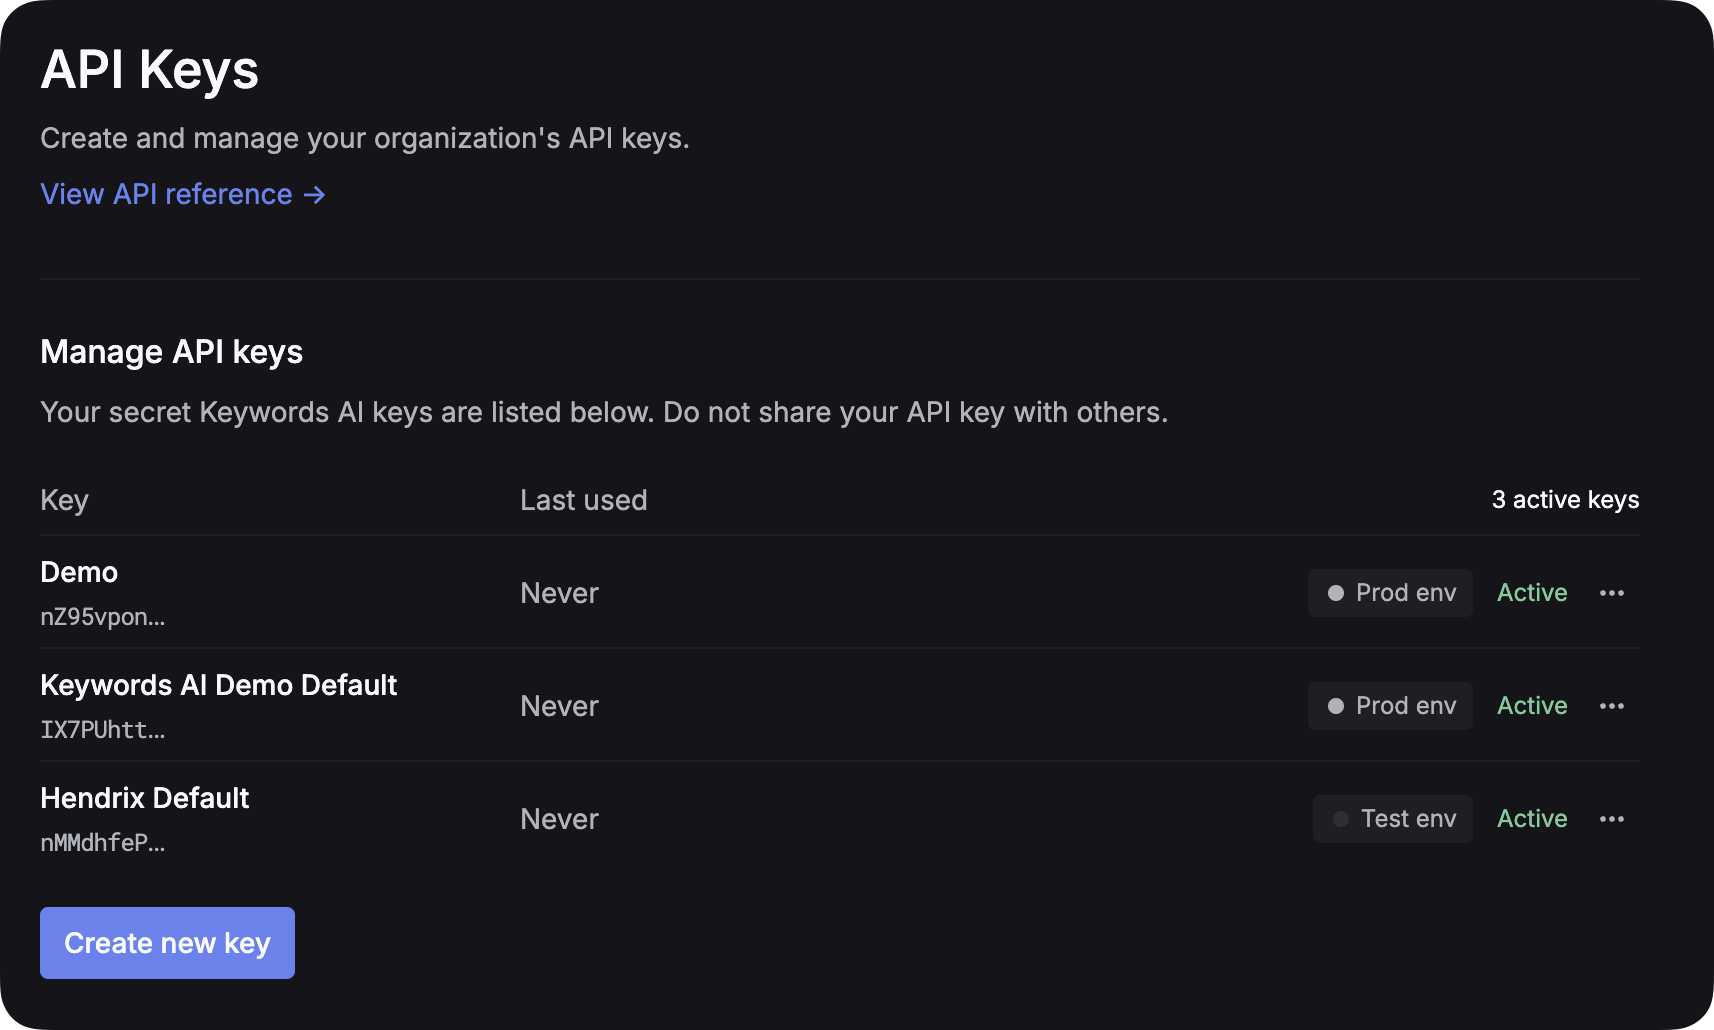
After you create an account on [Keywords AI](https://platform.keywordsai.co), you can get your API key from the [API keys page](https://platform.keywordsai.co/platform/api/api-keys).
 ### 2. Set up LLM provider API key
**Environment Management**: To separate test and production environments, create separate API keys for each environment instead of using an `env` parameter. This approach provides better security and clearer separation between your development and production workflows.
For all AI gateway users, you have to add your own credentials to activate AI gateway. We will use your credentials to call LLMs on your behalf.
For example, if you want to use OpenAI, you have to add your OpenAI API key to activate AI gateway.
We won’t use your credentials for any other purposes.
* [Set up LLM provider API key](https://platform.keywordsai.co/platform/api/providers)
### 3. Create your first prompt
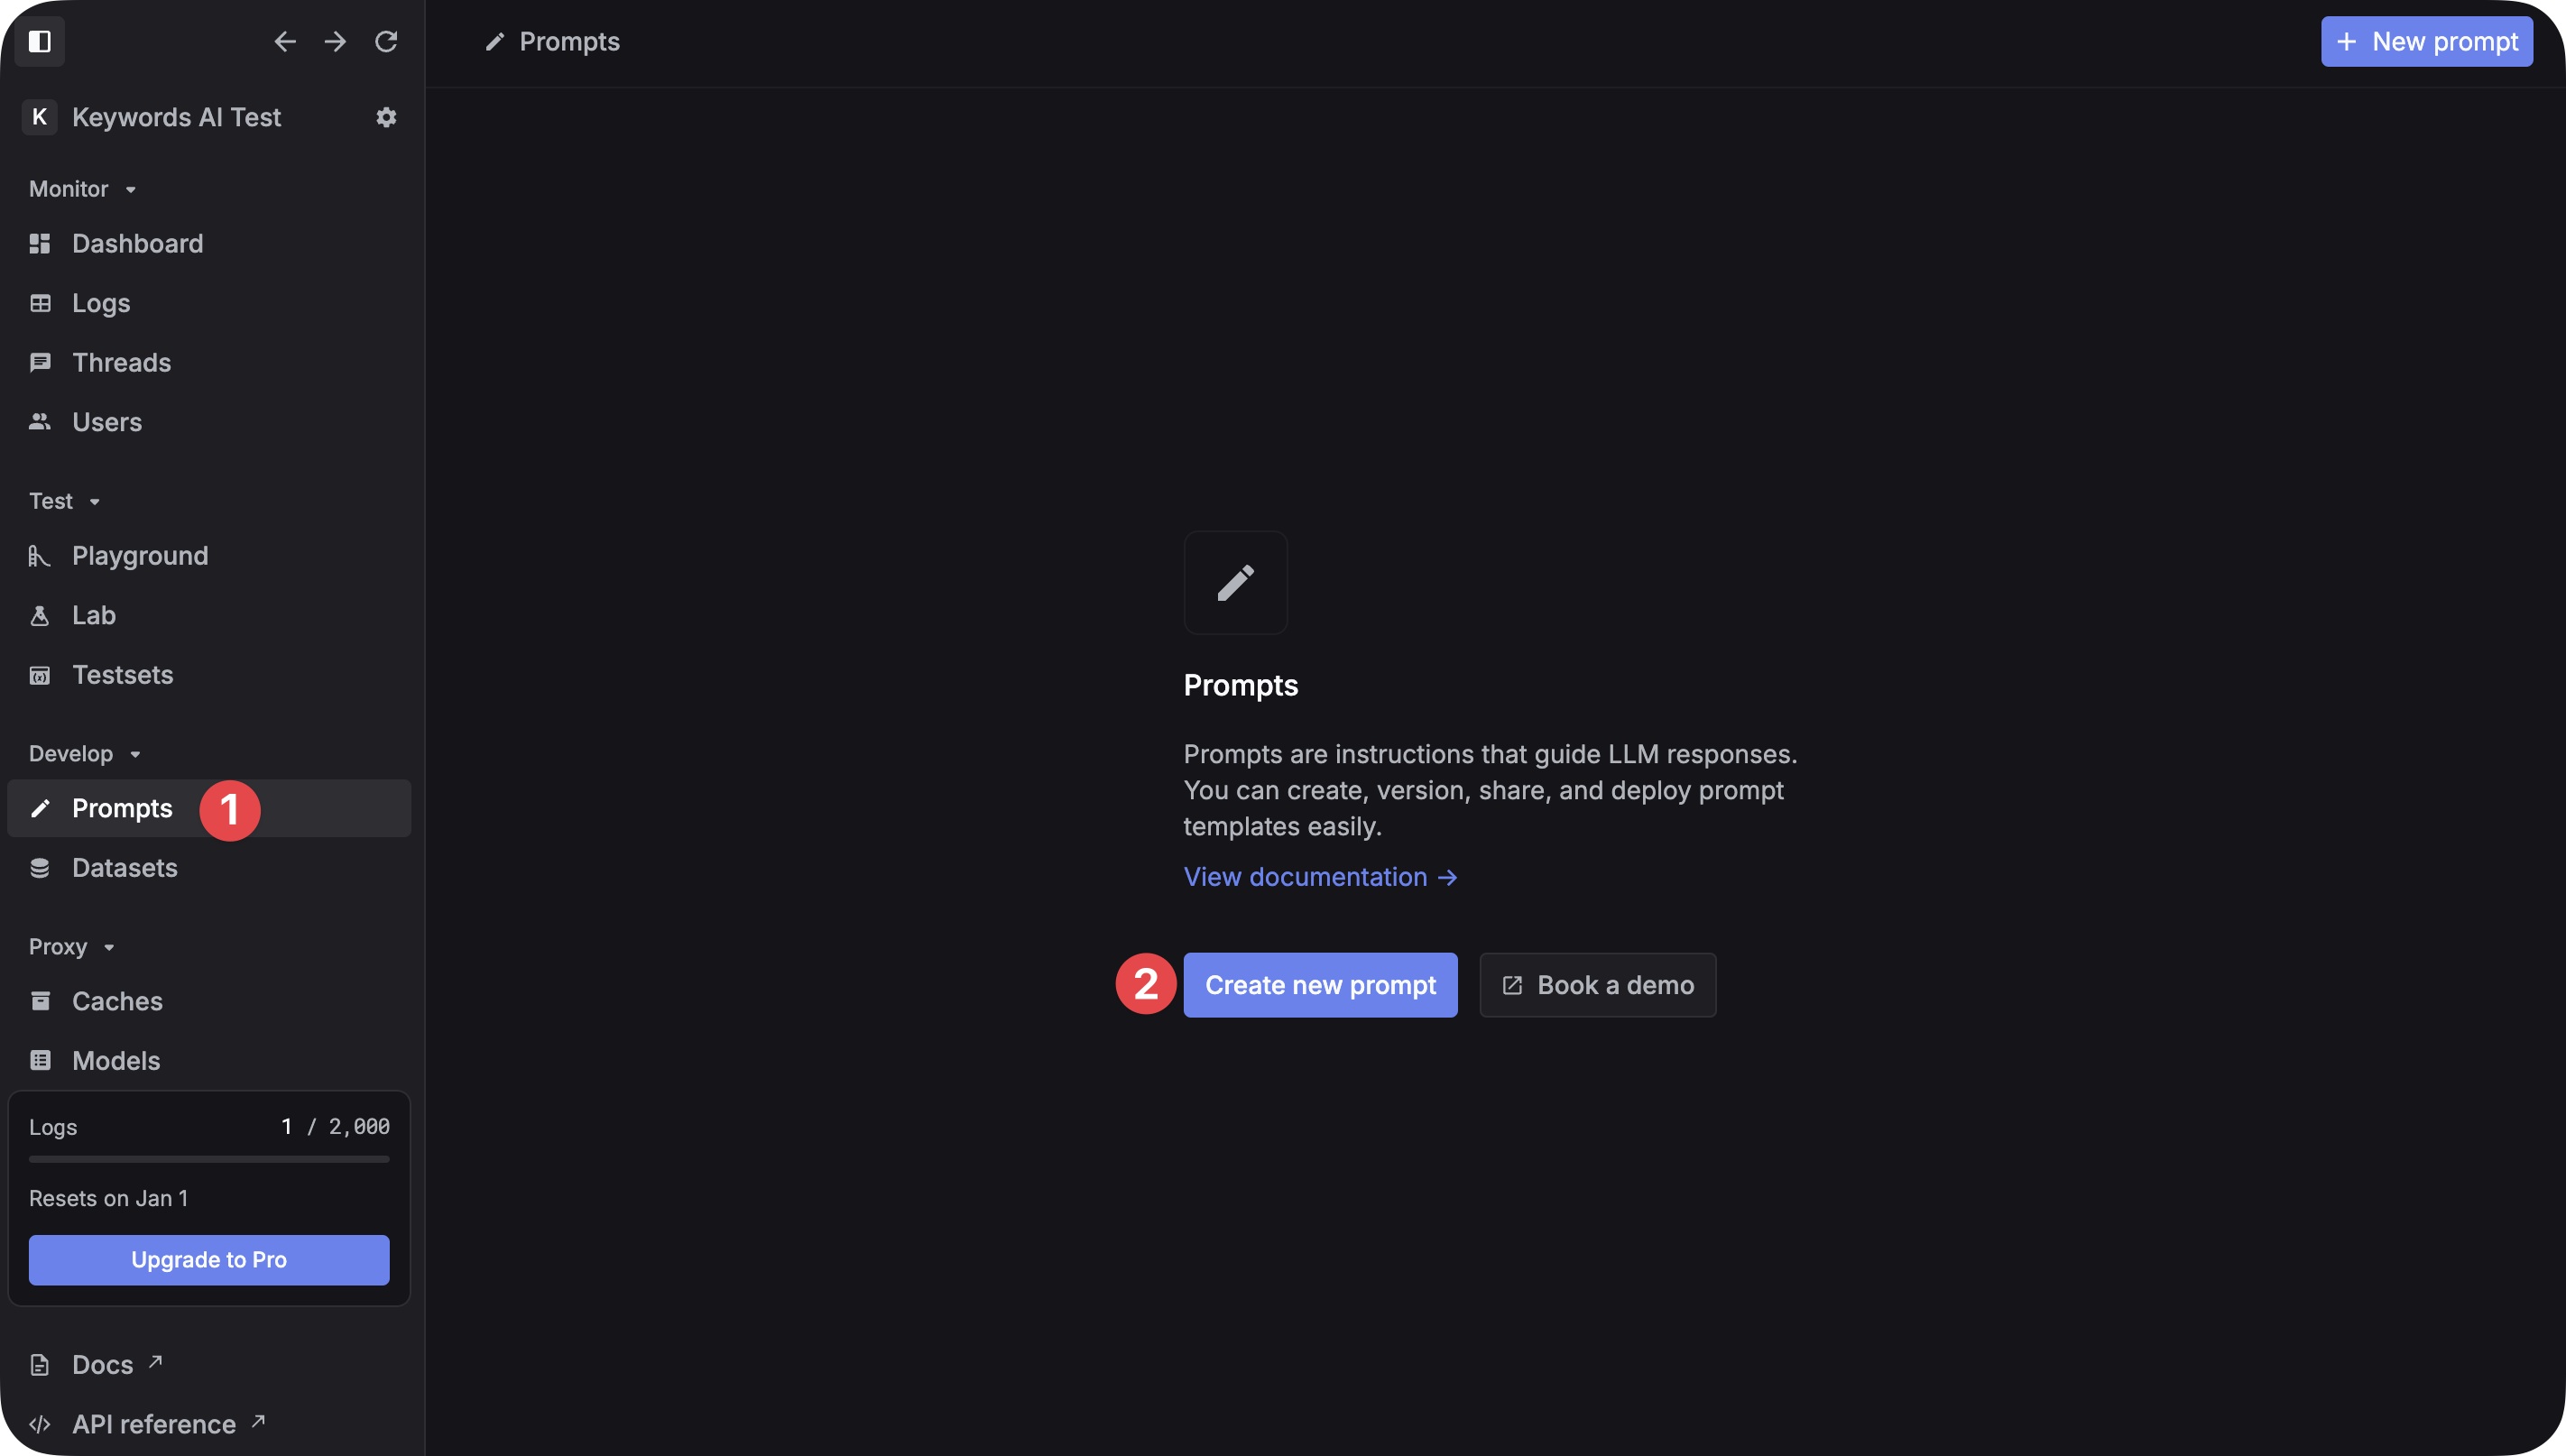
Once you have signed up and created an account, you can create a new prompt on the platform. Go to the [Prompts page](https://platform.keywordsai.co/platform/prompts) and click on the "Create new prompt" button. You should name your prompt and could add a description to it.
### 2. Set up LLM provider API key
**Environment Management**: To separate test and production environments, create separate API keys for each environment instead of using an `env` parameter. This approach provides better security and clearer separation between your development and production workflows.
For all AI gateway users, you have to add your own credentials to activate AI gateway. We will use your credentials to call LLMs on your behalf.
For example, if you want to use OpenAI, you have to add your OpenAI API key to activate AI gateway.
We won’t use your credentials for any other purposes.
* [Set up LLM provider API key](https://platform.keywordsai.co/platform/api/providers)
### 3. Create your first prompt
Once you have signed up and created an account, you can create a new prompt on the platform. Go to the [Prompts page](https://platform.keywordsai.co/platform/prompts) and click on the "Create new prompt" button. You should name your prompt and could add a description to it.
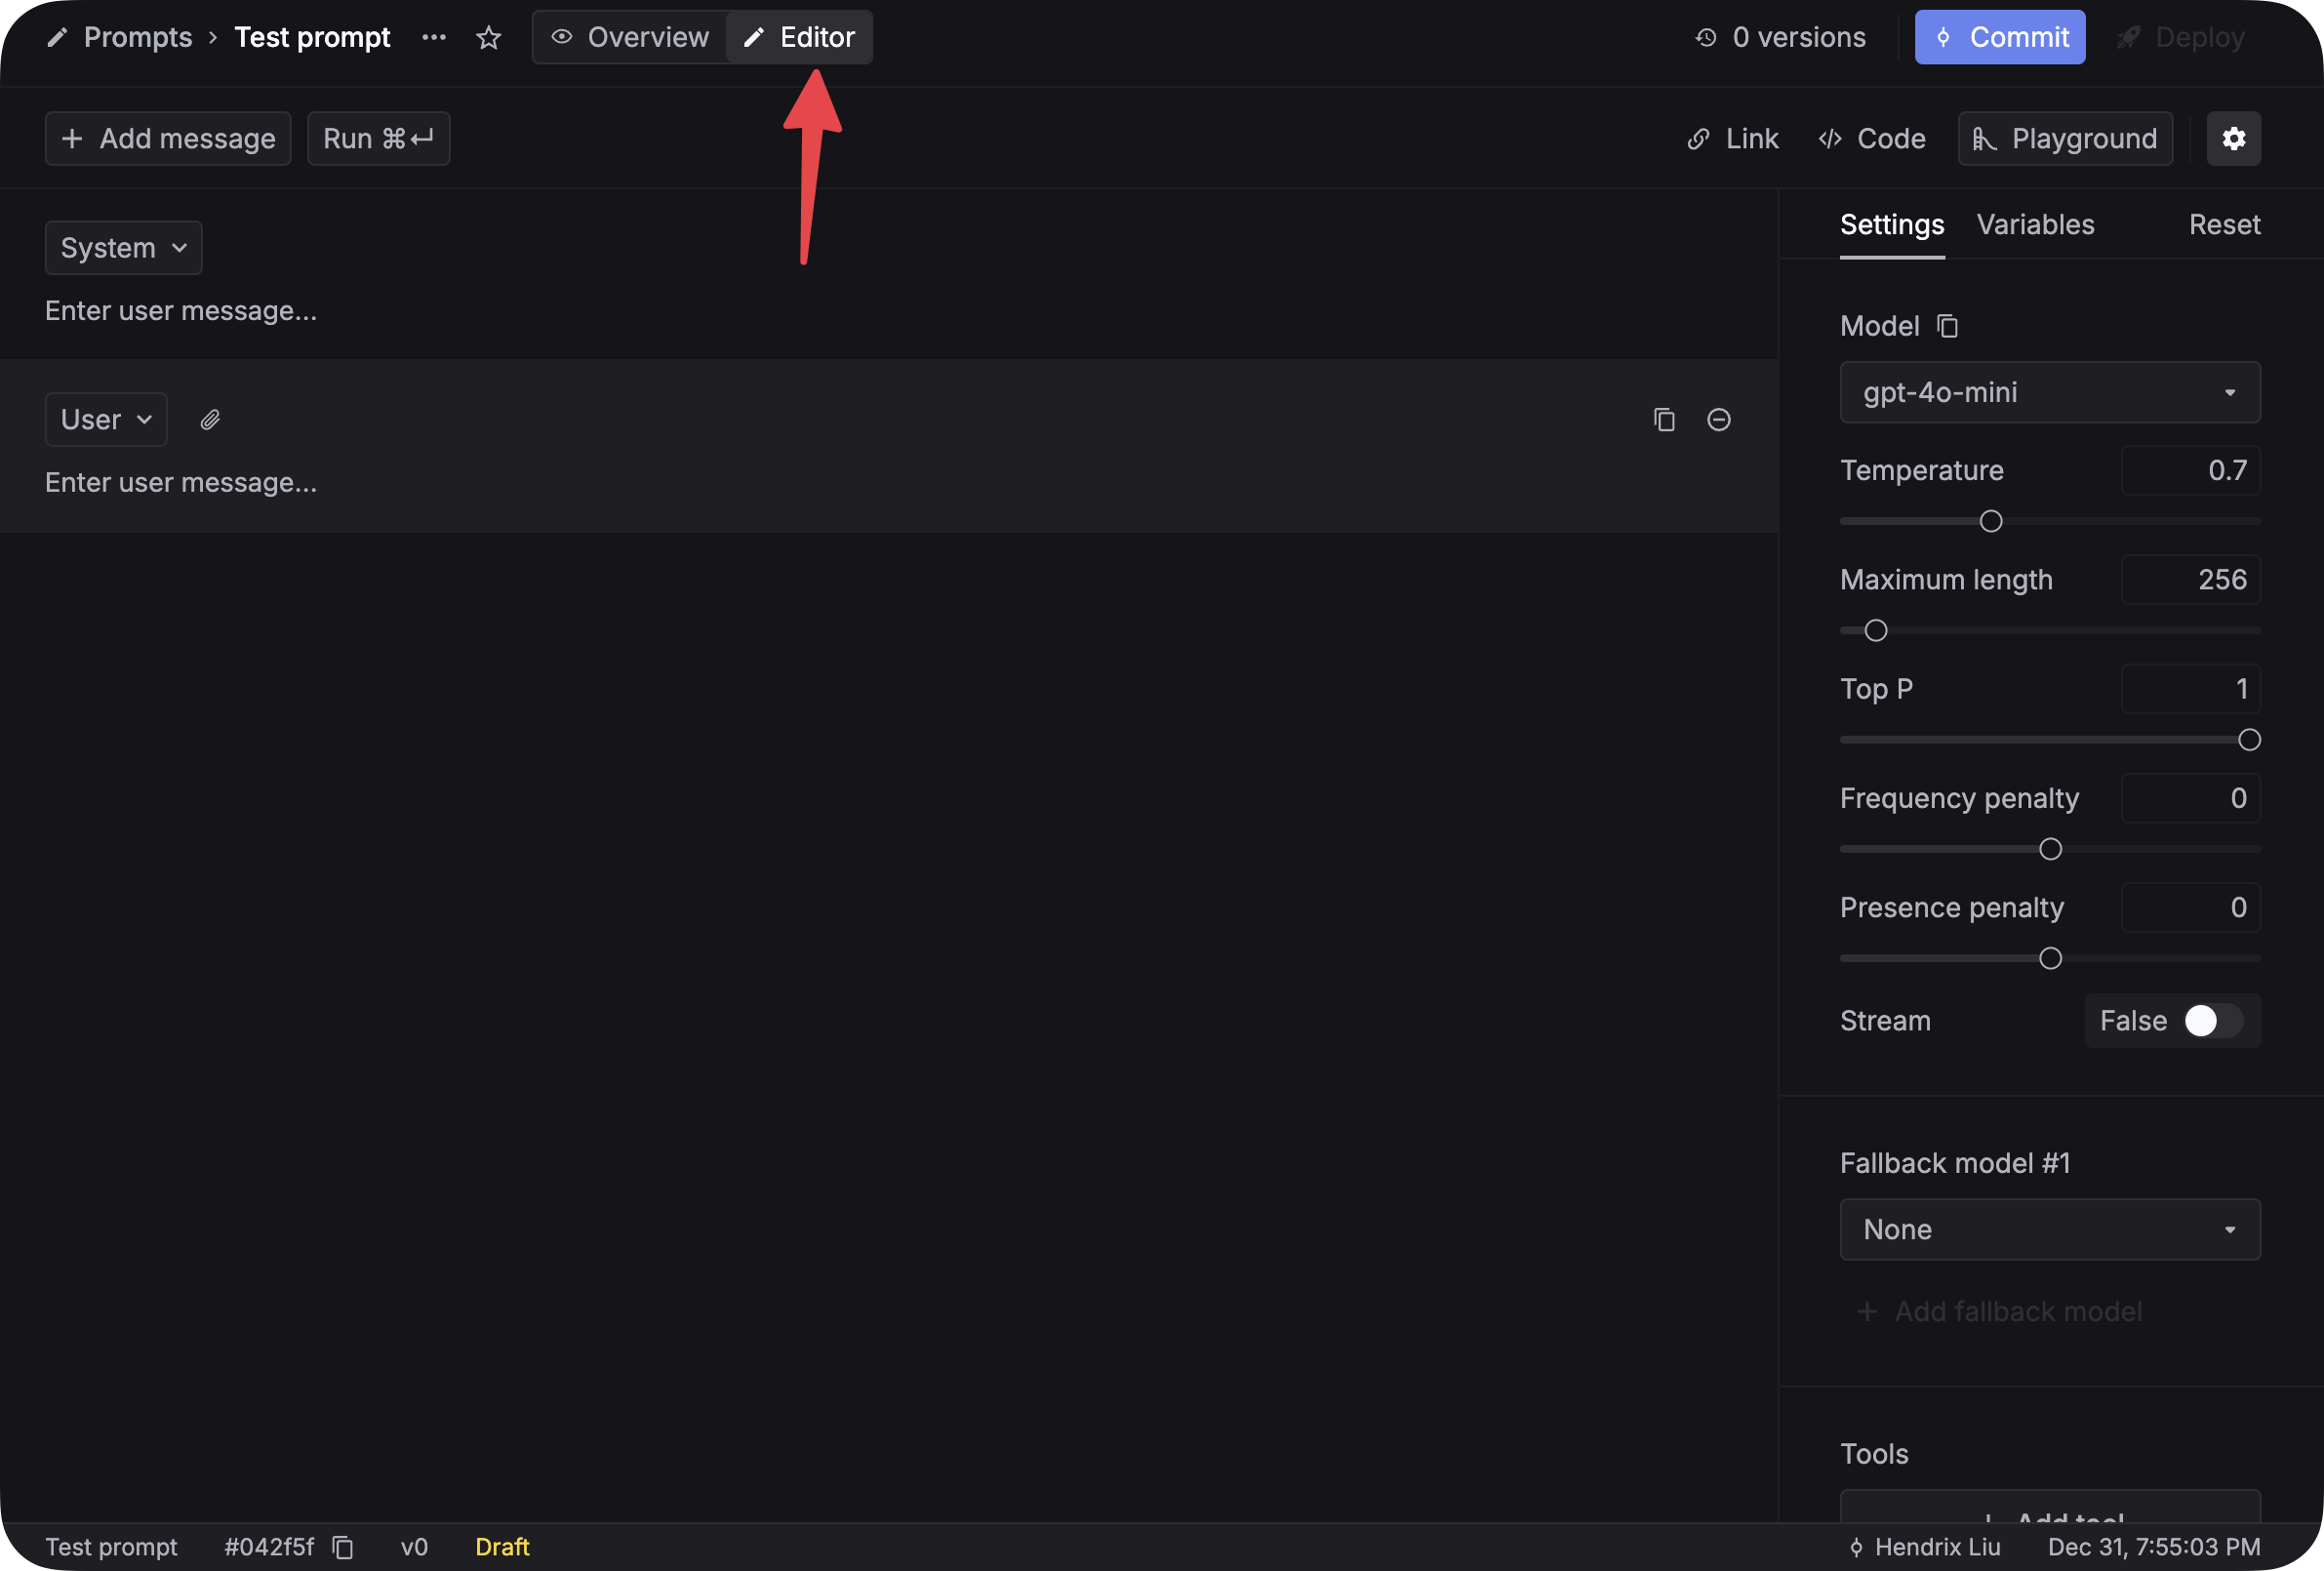
 Once you have created a new prompt, you can configure it. Go to the `Editor` tab and you can begin to write your prompt. The right side of the screen defines your prompt. You can set parameters like `Model`, `Temperature`, `Max Tokens`, and `Top P`. You can also add function calls and fallback models to your prompt. Check out the details [here](/api-endpoints/observe/logs/create).
 Once you have configured your prompt, you can write the content of your prompt. Click on the `+ Add message` button to add a new message to your prompt. You can change the role of the message to `user` or `assistant` by clicking on the role name.
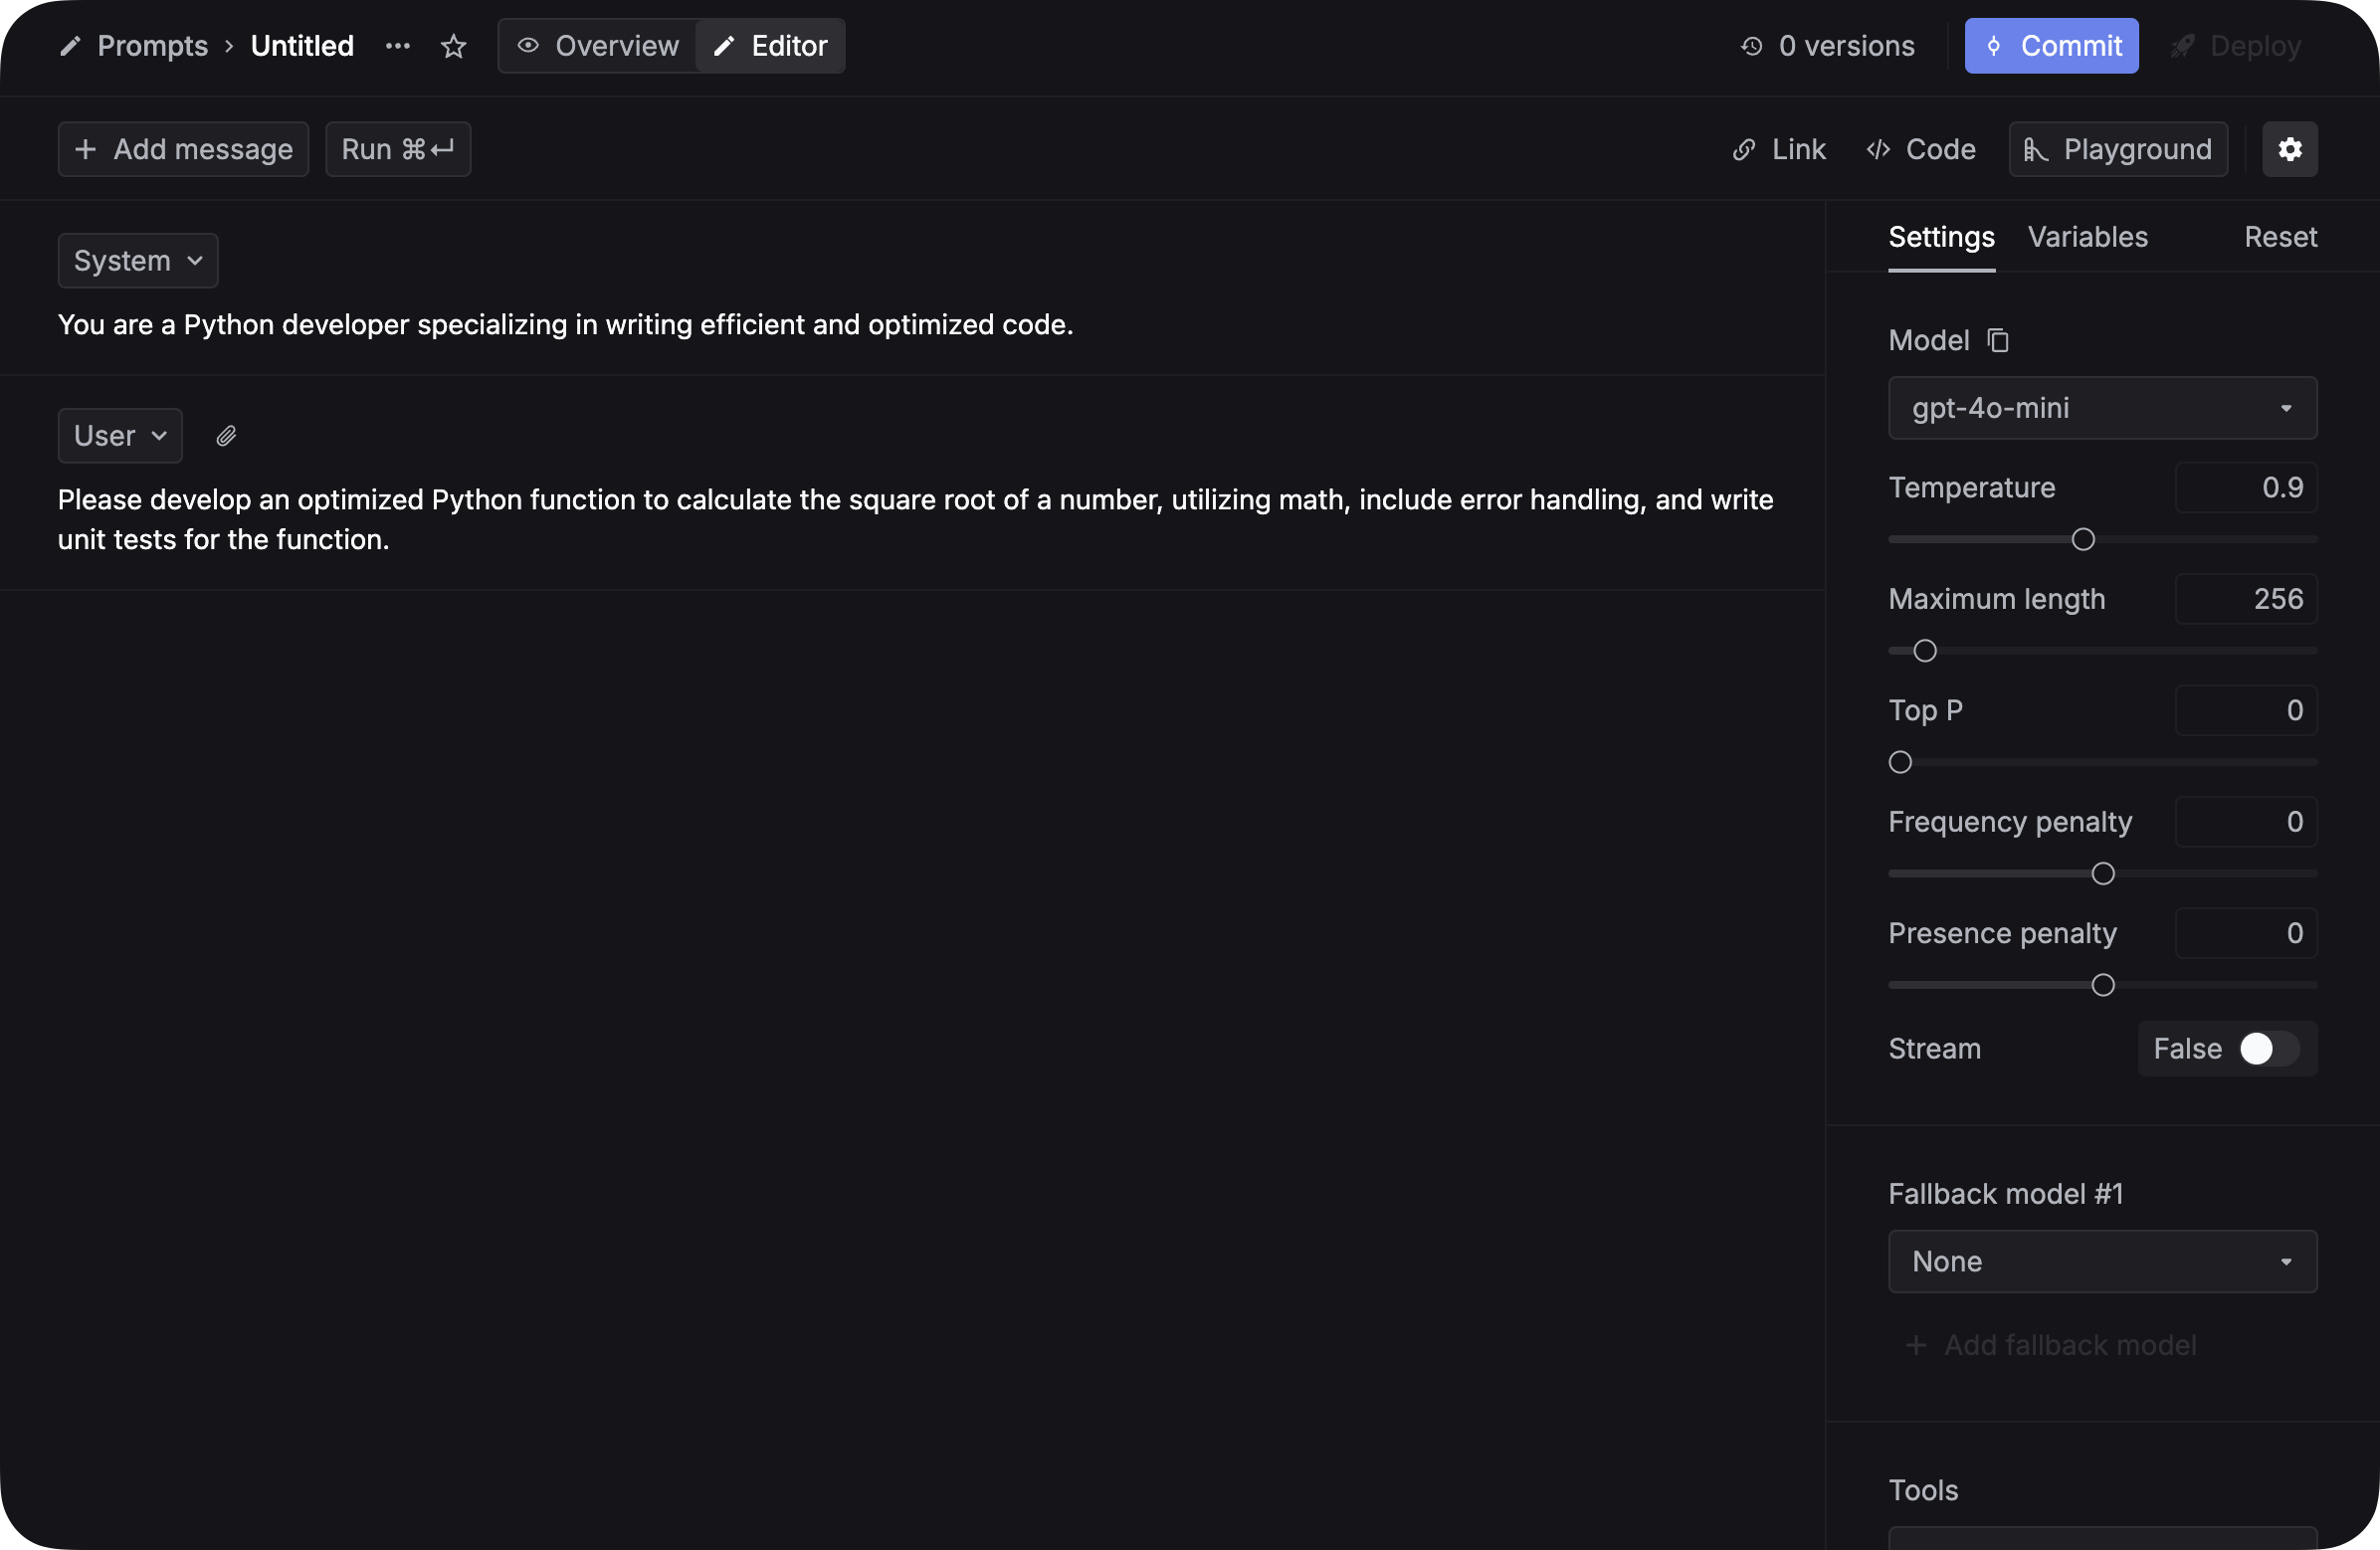 You can also add variables to your prompt. Variables are placeholders for dynamic content that can be used to generate prompts. Simply add double curly braces `{{variable_name}}` to your prompt and you will be able to use the variable in your prompt.
Replace the User message with this:
```
Please develop an optimized Python function to {{task_description}},
utilizing {{specific_library}},include error handling, and write unit tests for the function.
```
The format of the variable can't be `{{task description}}`. It should be `{{task_description}}` with "\_" instead of spaces.
You can also add variables to your prompt. Variables are placeholders for dynamic content that can be used to generate prompts. Simply add double curly braces `{{variable_name}}` to your prompt and you will be able to use the variable in your prompt.
Replace the User message with this:
```
Please develop an optimized Python function to {{task_description}},
utilizing {{specific_library}},include error handling, and write unit tests for the function.
```
The format of the variable can't be `{{task description}}`. It should be `{{task_description}}` with "\_" instead of spaces.
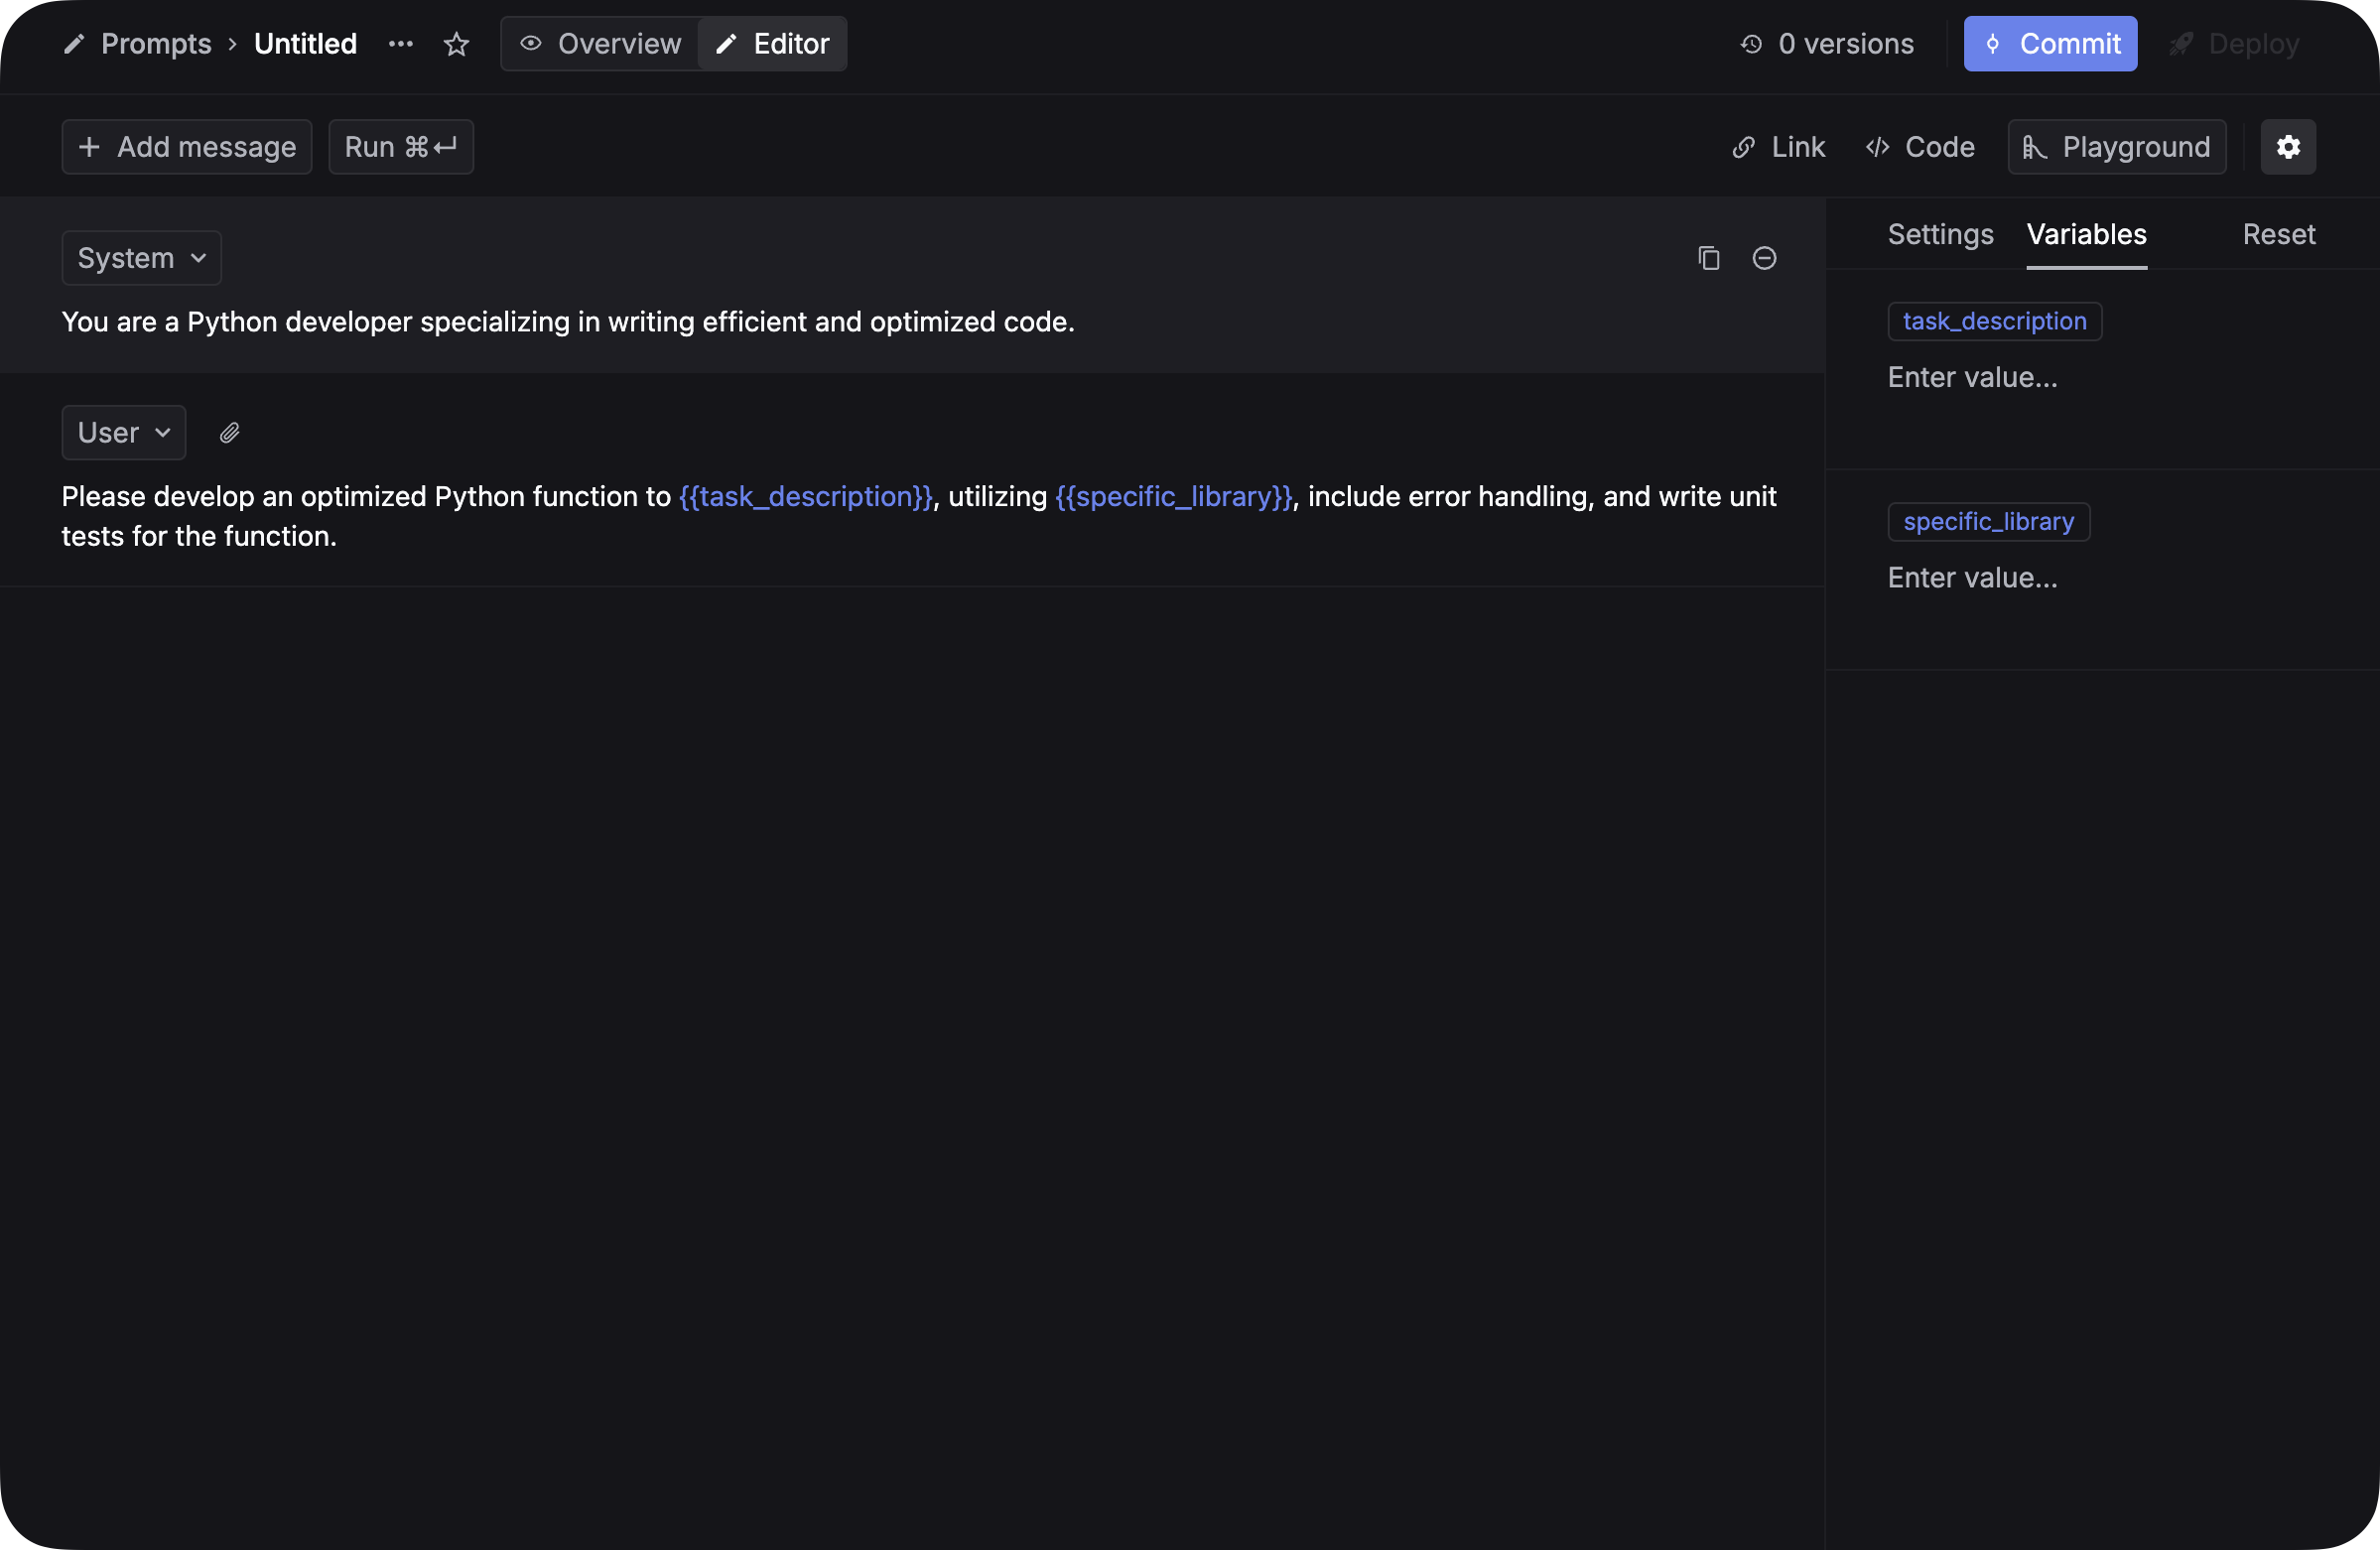 After did this, you can:
1. Add a value for each variable in the `Variables` tab.
2. Click `Run` to test your prompt.
You now just finished writing your first version of the prompt.
You can click on the `Commit` button and write a commit message, which is helpful for you to track the changes you made to your prompt.
**Avoid "Commit + deploy"**: The `Commit + deploy` button will both commit your changes and immediately deploy them to production, making them live instantly. Only use this button if you understand that your changes will go live immediately and have tested them thoroughly.
After did this, you can:
1. Add a value for each variable in the `Variables` tab.
2. Click `Run` to test your prompt.
You now just finished writing your first version of the prompt.
You can click on the `Commit` button and write a commit message, which is helpful for you to track the changes you made to your prompt.
**Avoid "Commit + deploy"**: The `Commit + deploy` button will both commit your changes and immediately deploy them to production, making them live instantly. Only use this button if you understand that your changes will go live immediately and have tested them thoroughly.
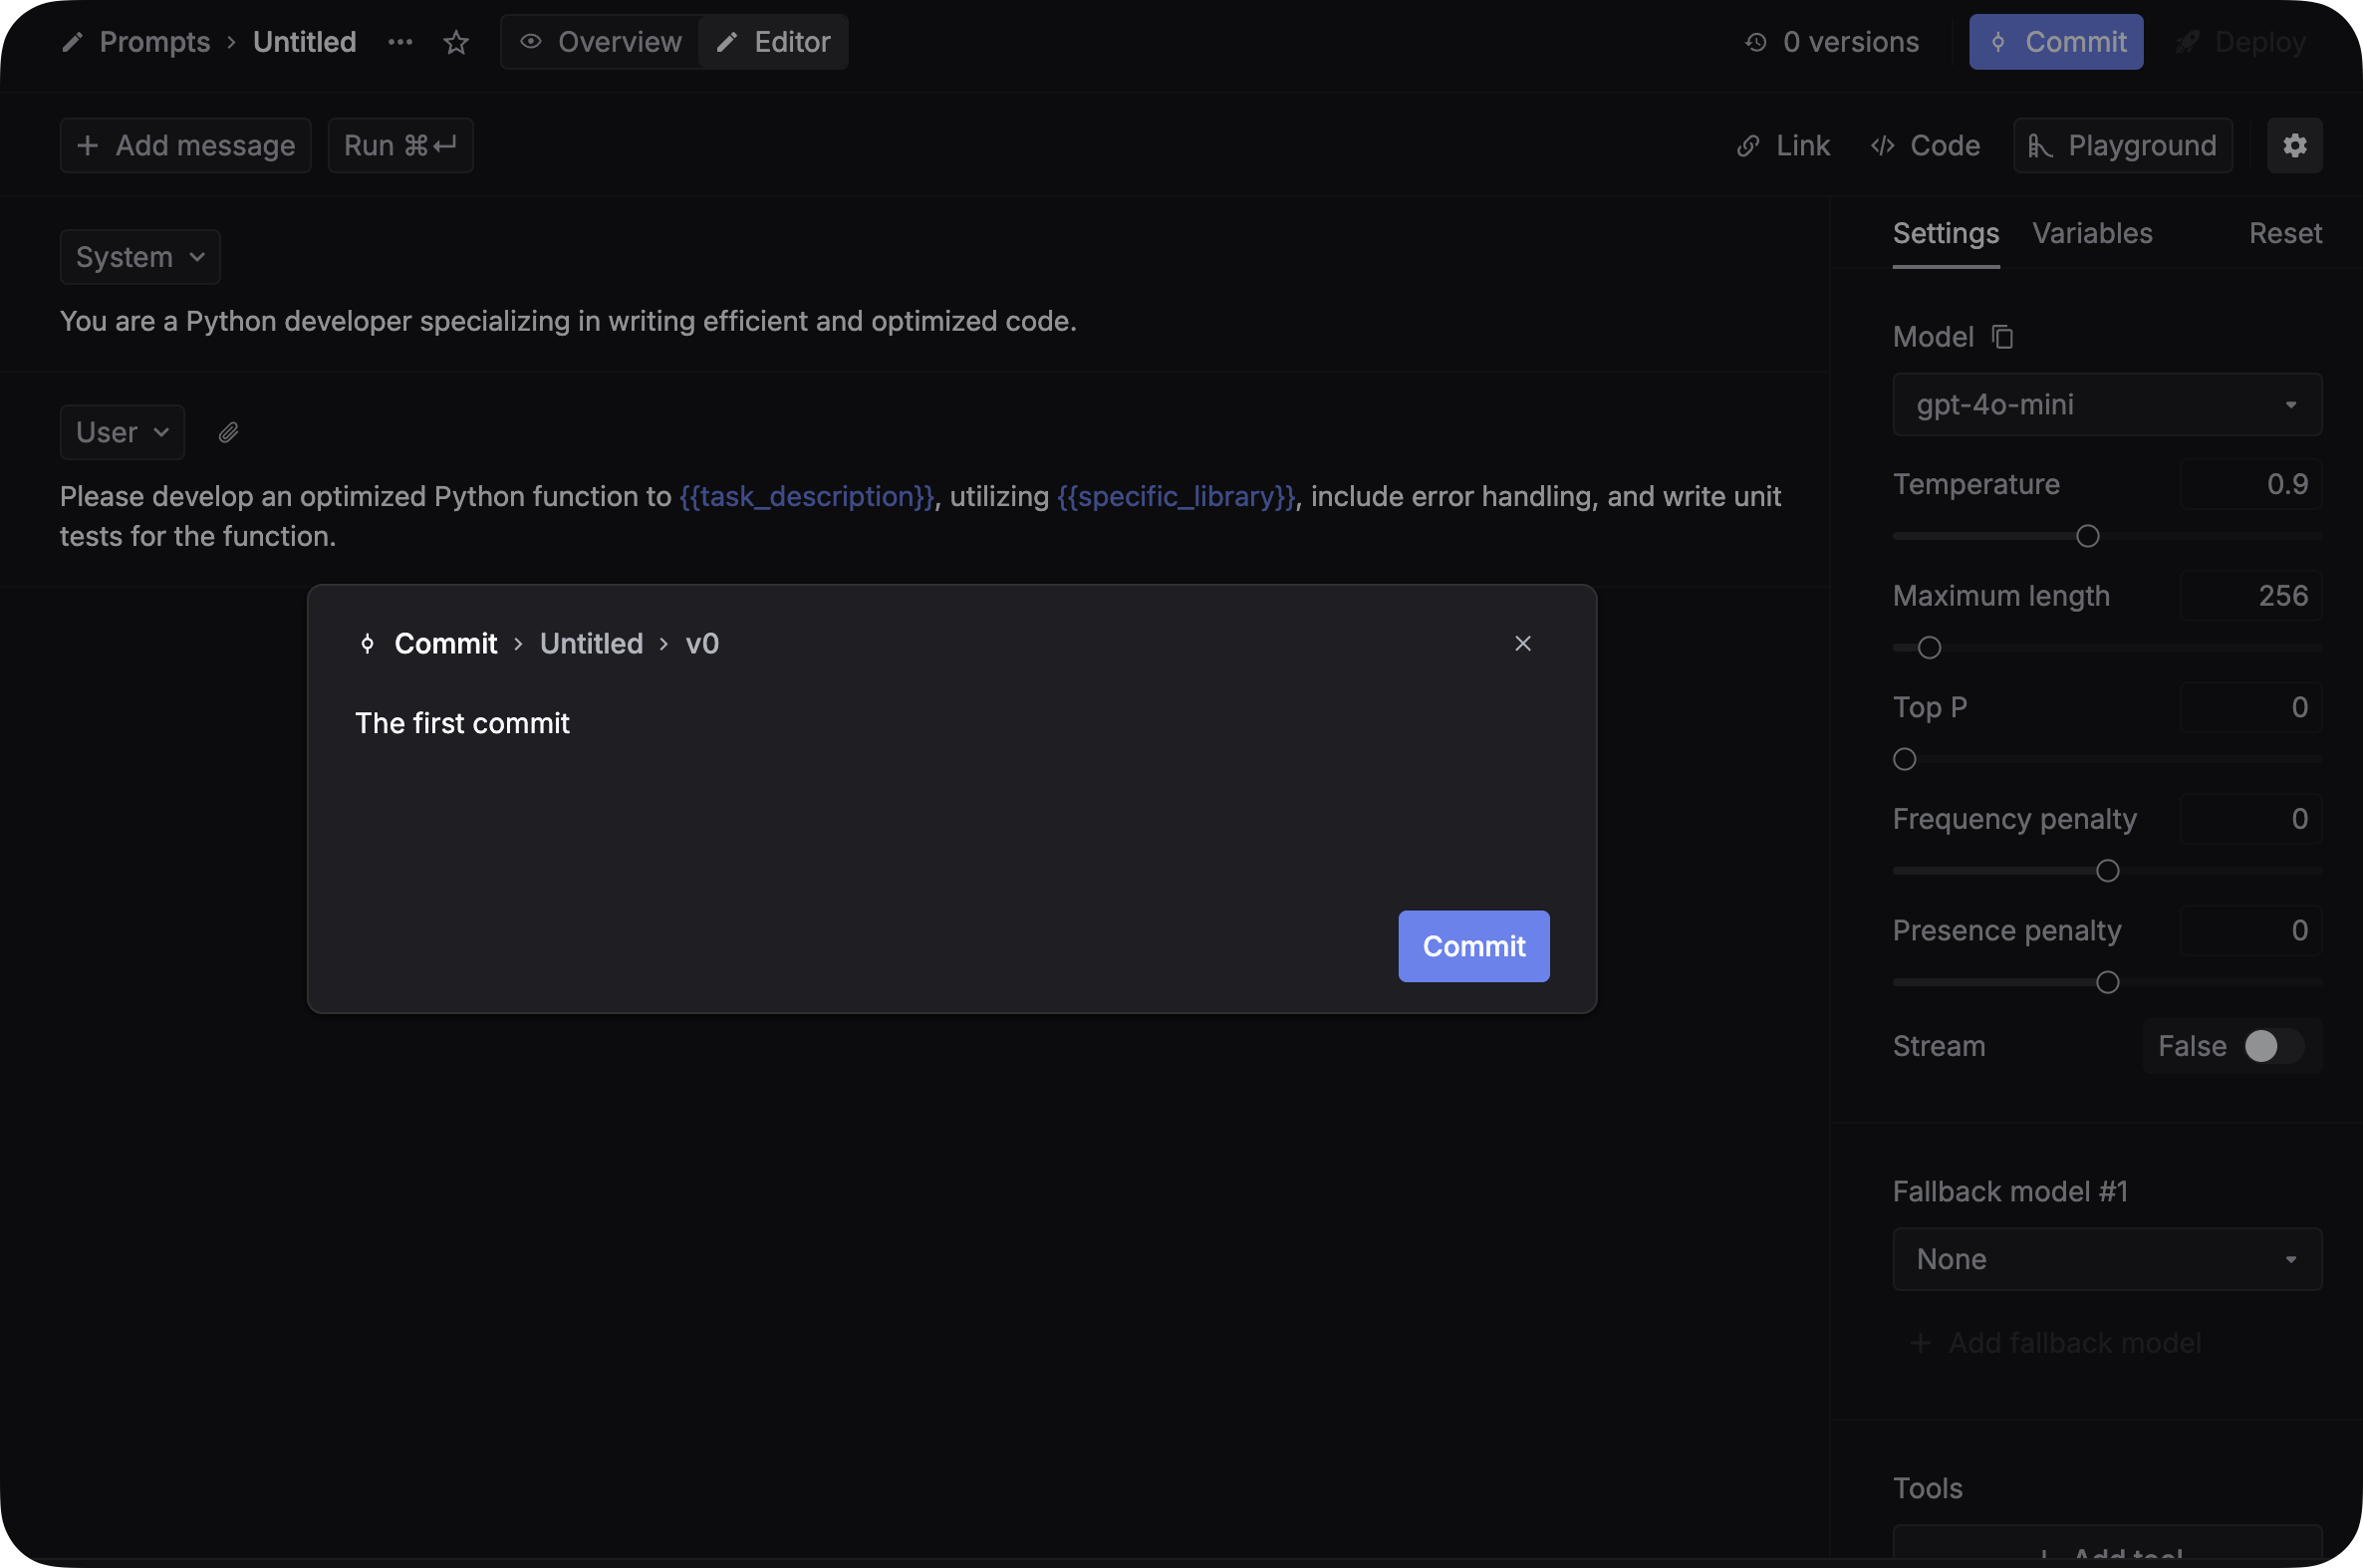 Congrats! You just created your first prompt on Keywords AI platform.
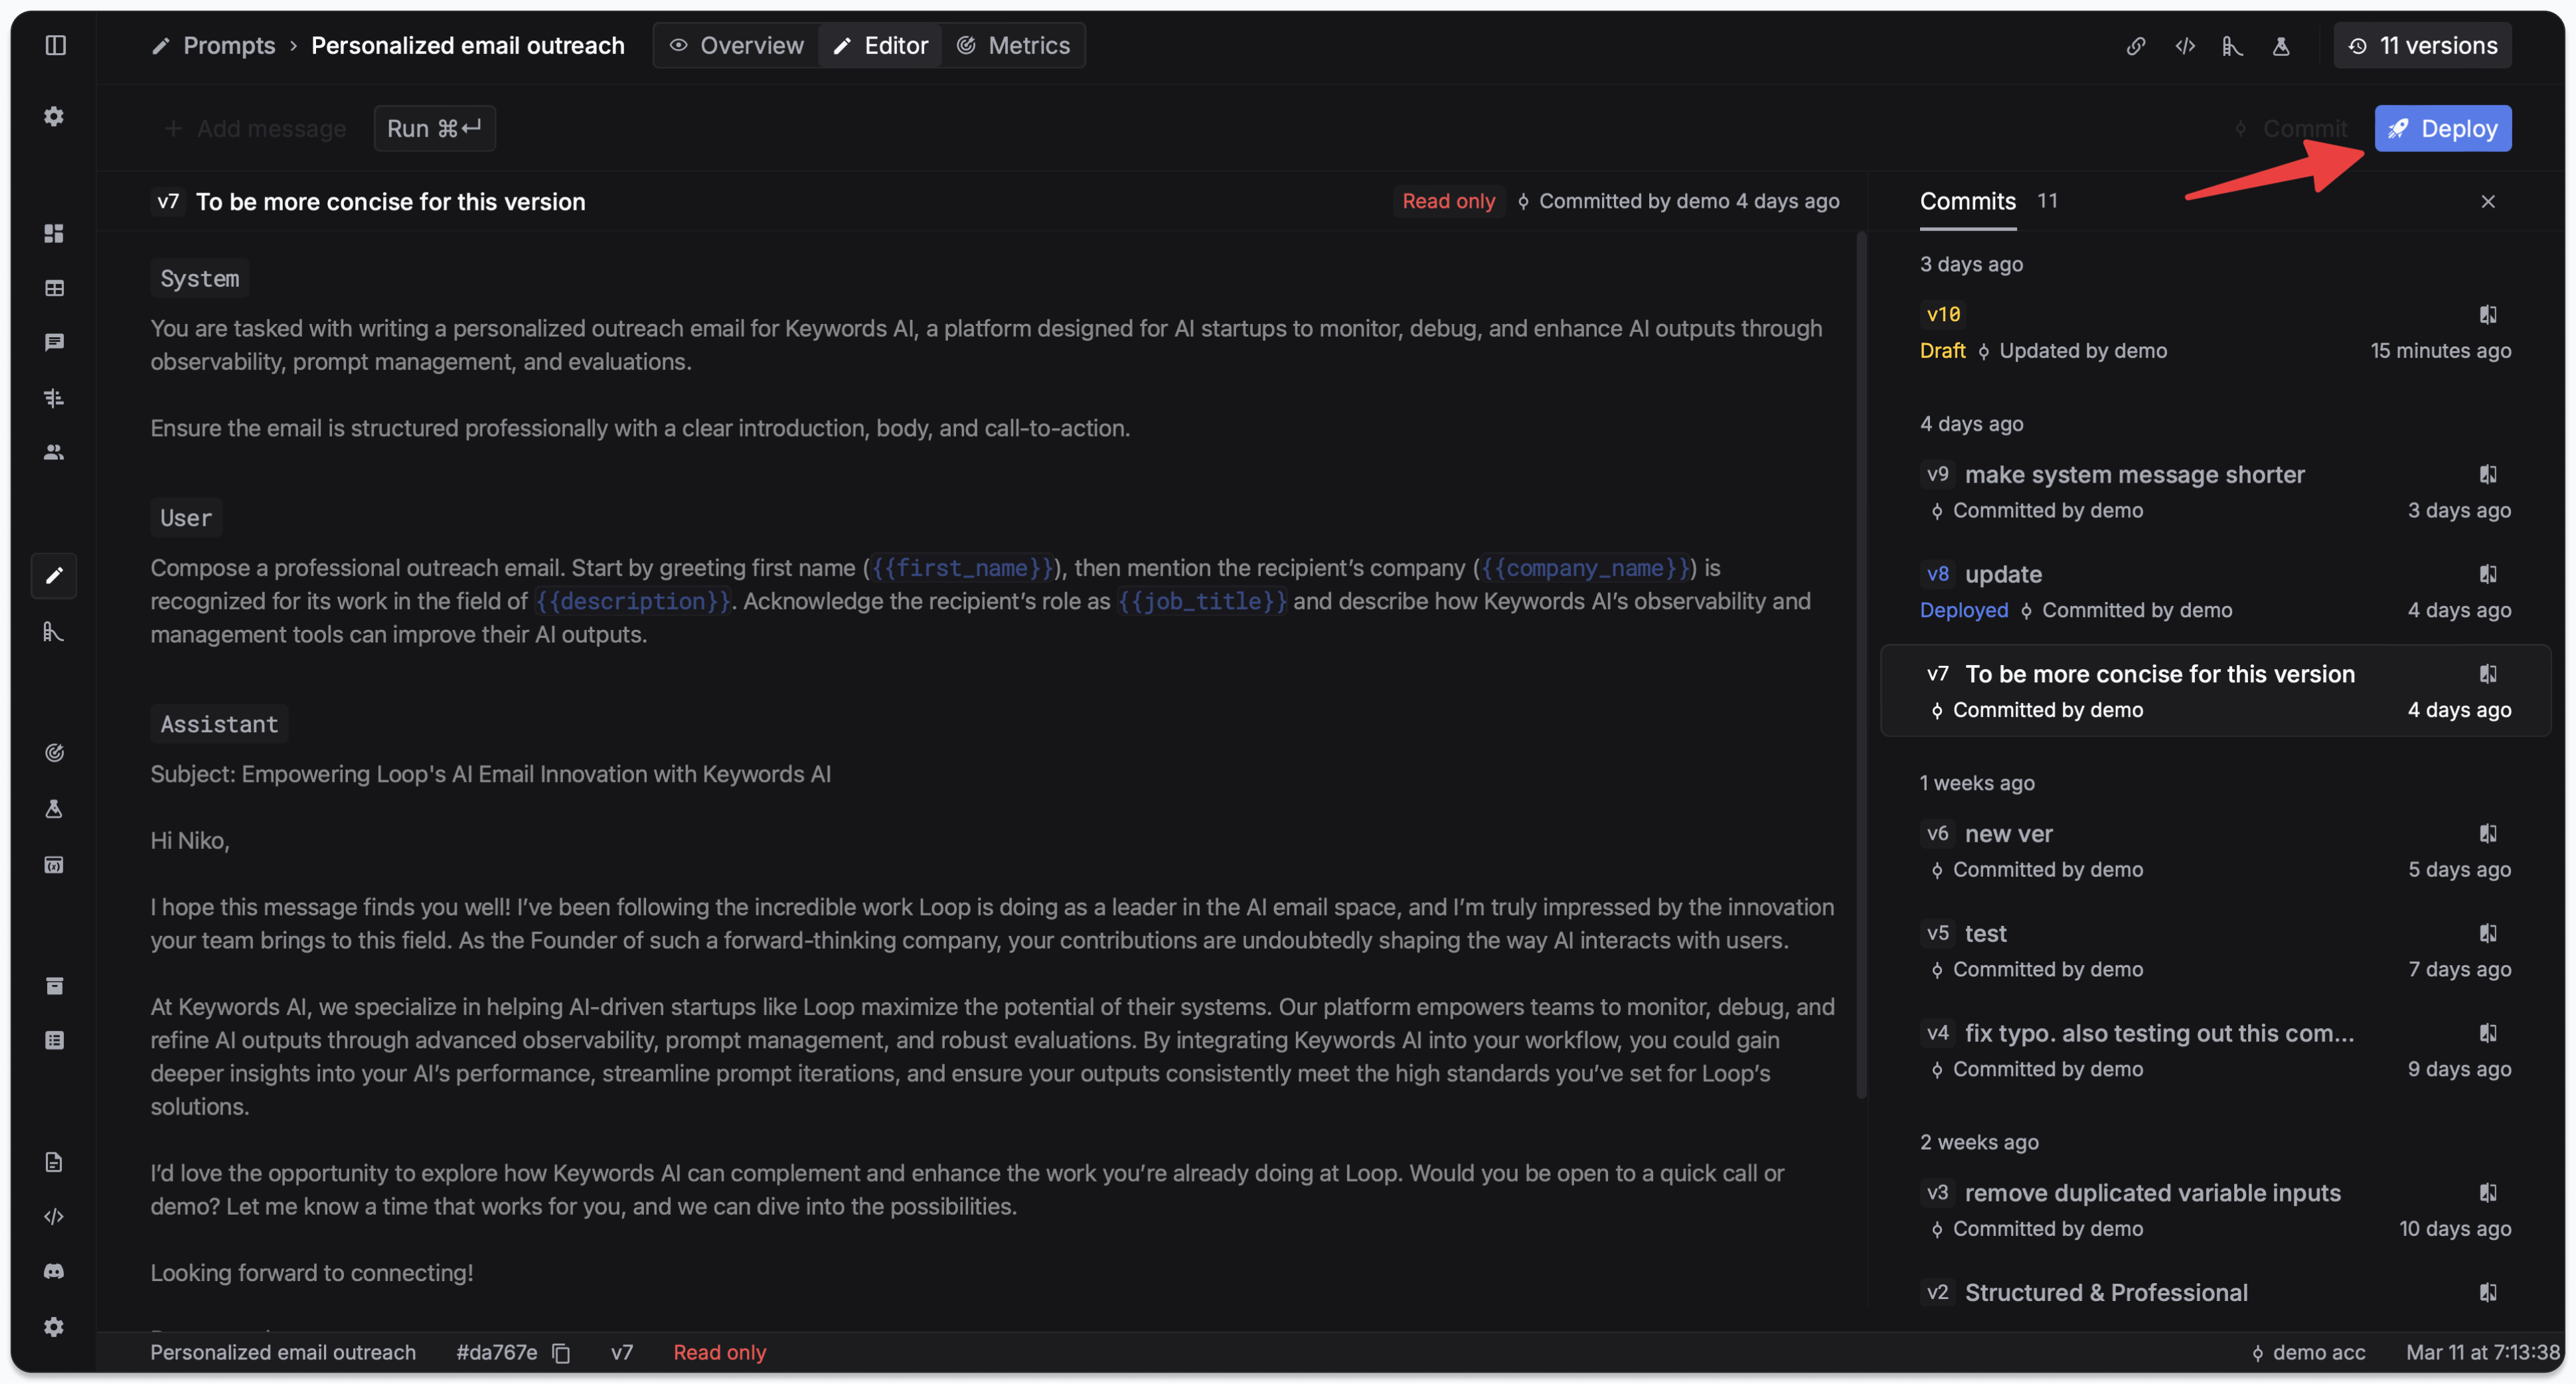
Once you have committed your prompt, you can deploy it to production. Go to the `Deployments` tab and click on the `Deploy` button. You can choose the environment you want to deploy to.
**Immediate Live Effect**: Deploying a prompt will immediately reflect live in your production environment. All API calls using this prompt will start using the deployed version right away. Make sure you've tested your prompt thoroughly before deploying.
Congrats! You just created your first prompt on Keywords AI platform.
Once you have committed your prompt, you can deploy it to production. Go to the `Deployments` tab and click on the `Deploy` button. You can choose the environment you want to deploy to.
**Immediate Live Effect**: Deploying a prompt will immediately reflect live in your production environment. All API calls using this prompt will start using the deployed version right away. Make sure you've tested your prompt thoroughly before deploying.
 ***
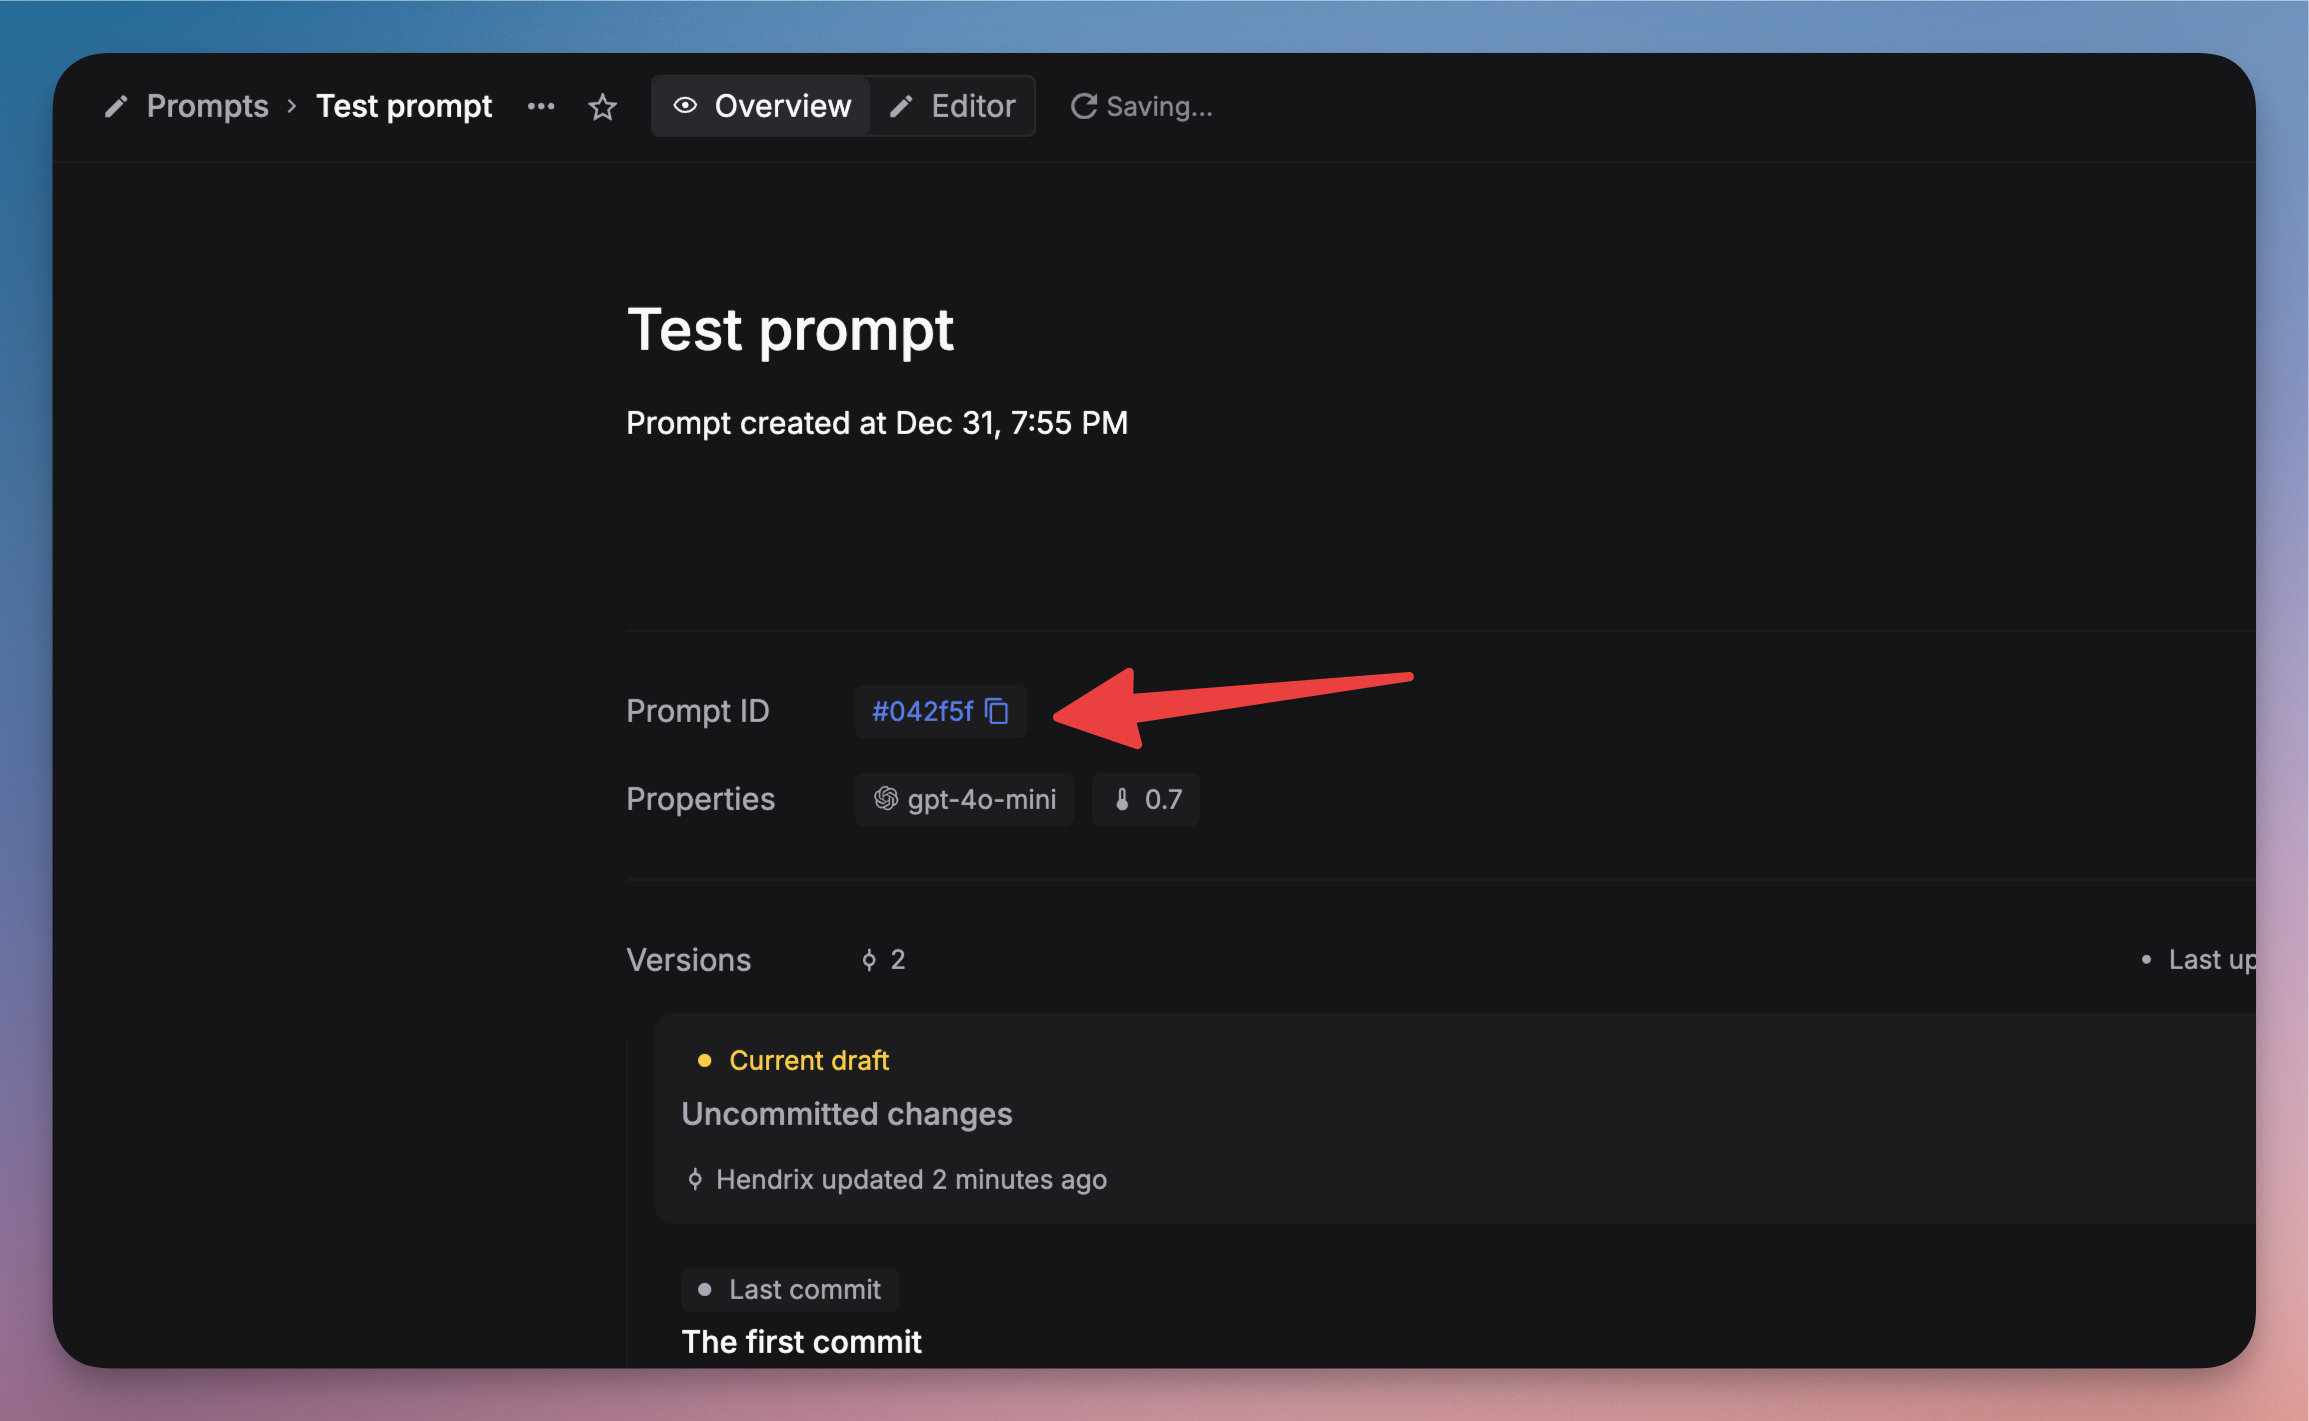
### 4. Find your prompt ID
After creating your prompt, you'll need its ID to use it in code. Find the Prompt ID in the Overview panel on the [Prompts page](https://platform.keywordsai.co/platform/prompts).
***
### 4. Find your prompt ID
After creating your prompt, you'll need its ID to use it in code. Find the Prompt ID in the Overview panel on the [Prompts page](https://platform.keywordsai.co/platform/prompts).
 ***
### 5. Use your prompt in code
Now you can call your prompt from your application using the Keywords AI API.
```python theme={"system"}
from openai import OpenAI
client = OpenAI(
base_url="https://api.keywordsai.co/api/",
api_key="YOUR_KEYWORDSAI_API_KEY",
)
response = client.chat.completions.create(
model="gpt-4o-mini", # This will be overridden by prompt config
messages=[{"role": "user", "content": "placeholder"}], # This will be overridden
extra_body={
"prompt": {
"prompt_id": "042f5f", # Your prompt ID here
"variables": {
"task_description": "Square a number",
"specific_library": "math"
},
"override": True # Use prompt config instead of SDK parameters
}
}
)
print(response.choices[0].message.content)
```
```typescript theme={"system"}
import { OpenAI } from "openai";
const client = new OpenAI({
baseURL: "https://api.keywordsai.co/api",
apiKey: "YOUR_KEYWORDSAI_API_KEY",
});
const response = await client.chat.completions.create({
messages: [{ role: "user", content: "placeholder" }],
model: "gpt-4o-mini",
// @ts-expect-error
prompt: {
prompt_id: "042f5f", // Your prompt ID here
variables: {
task_description: "Square a number",
specific_library: "math"
},
override: true
}
});
console.log(response.choices[0].message.content);
```
```python theme={"system"}
import requests
def call_prompt(api_key="YOUR_KEYWORDSAI_API_KEY"):
headers = {
'Content-Type': 'application/json',
'Authorization': f'Bearer {api_key}',
}
data = {
'prompt': {
'prompt_id': '042f5f', # Your prompt ID here
'variables': {
'task_description': 'Square a number',
'specific_library': 'math'
}
}
}
response = requests.post(
'https://api.keywordsai.co/api/chat/completions',
headers=headers,
json=data
)
return response.json()
result = call_prompt()
print(result['choices'][0]['message']['content'])
```
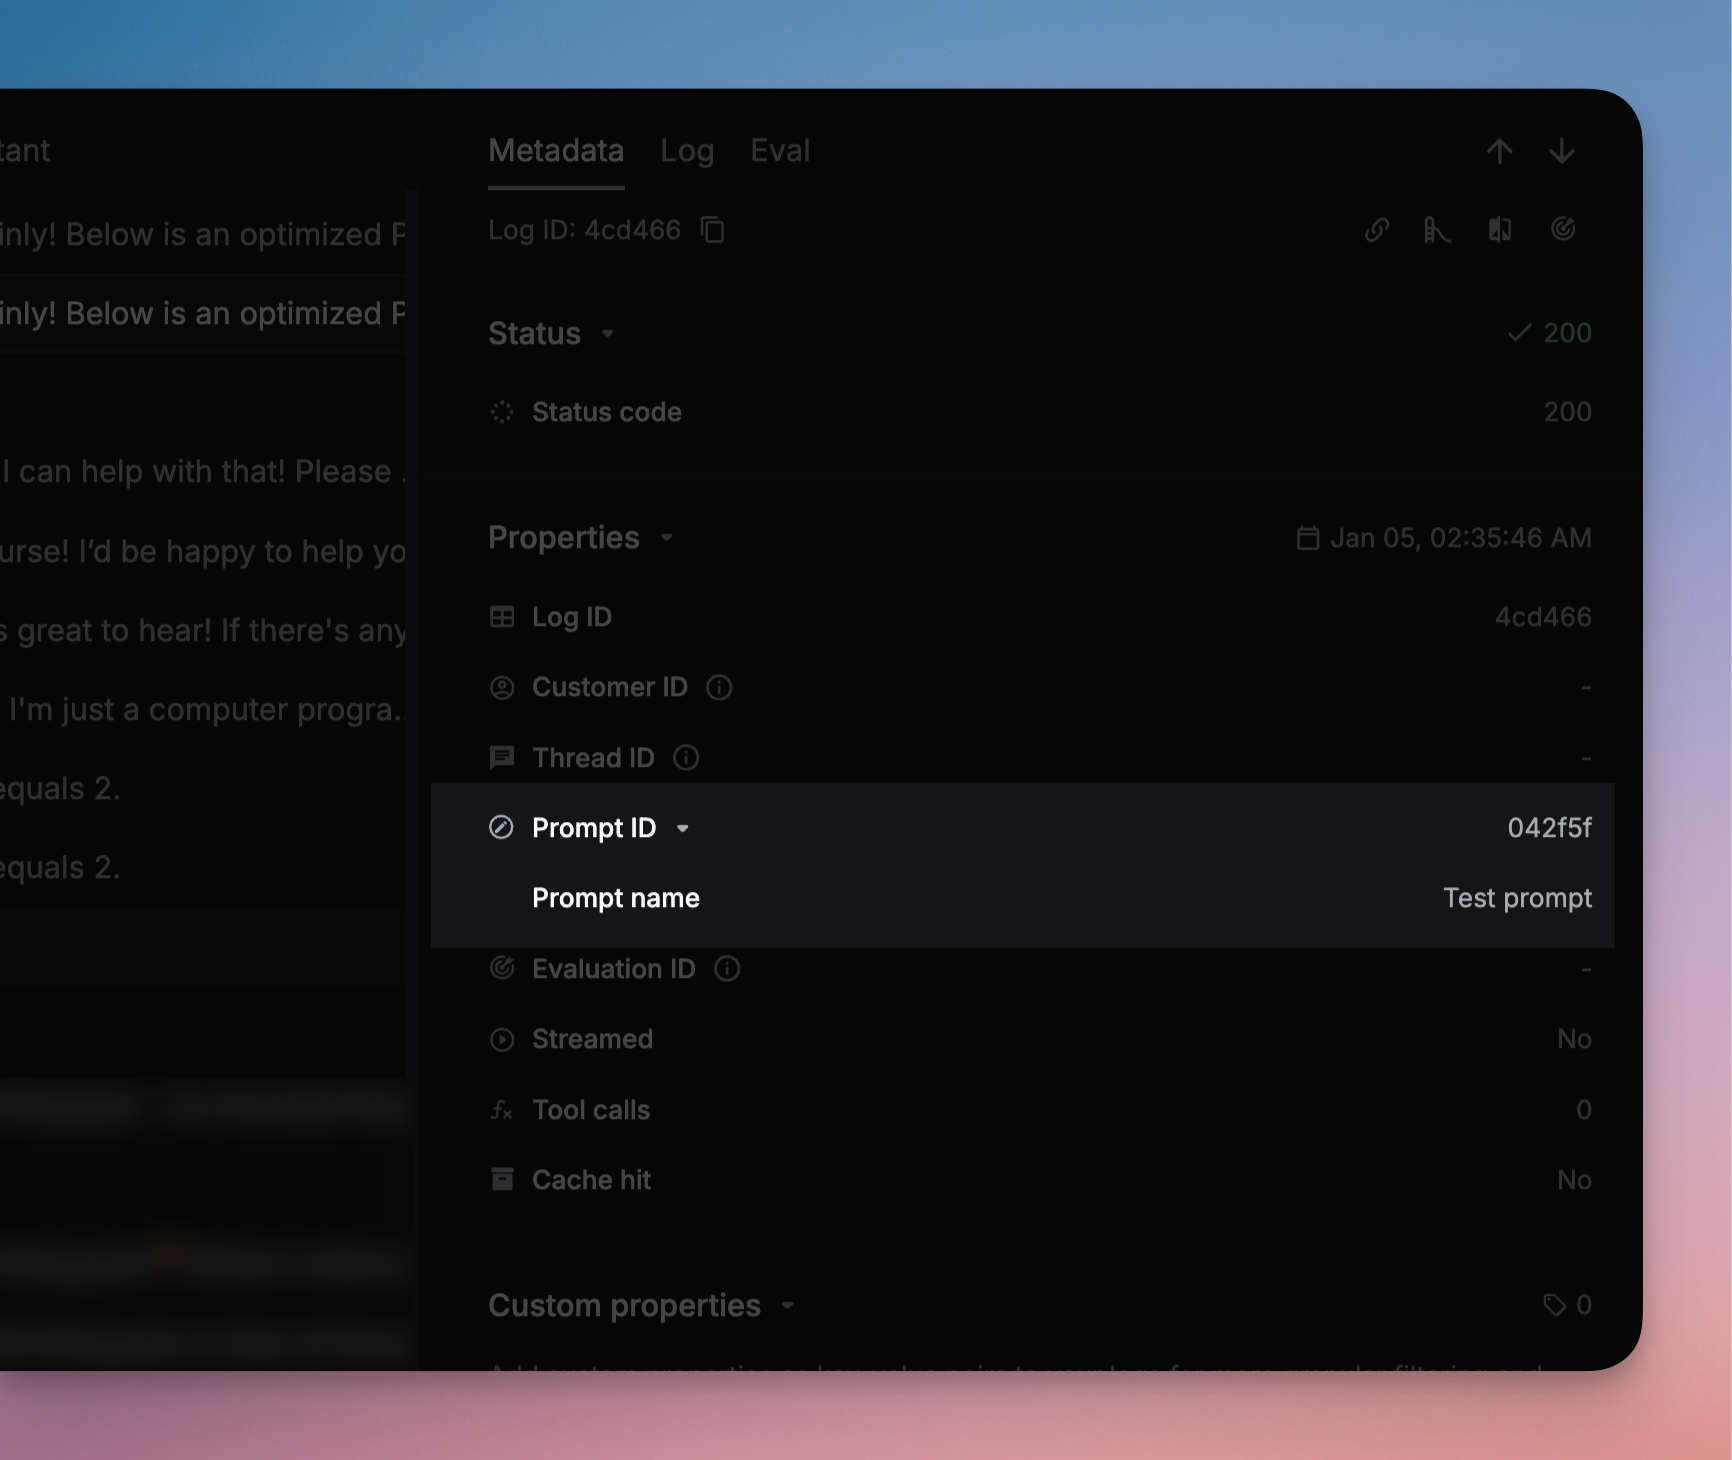
### 6. Monitor your prompts
View your prompt usage and performance on the [Logs page](https://platform.keywordsai.co/platform/requests). You can:
* Filter logs by prompt name
* See response times and token usage
* Debug individual prompt executions
* Track prompt performance over time
***
### 5. Use your prompt in code
Now you can call your prompt from your application using the Keywords AI API.
```python theme={"system"}
from openai import OpenAI
client = OpenAI(
base_url="https://api.keywordsai.co/api/",
api_key="YOUR_KEYWORDSAI_API_KEY",
)
response = client.chat.completions.create(
model="gpt-4o-mini", # This will be overridden by prompt config
messages=[{"role": "user", "content": "placeholder"}], # This will be overridden
extra_body={
"prompt": {
"prompt_id": "042f5f", # Your prompt ID here
"variables": {
"task_description": "Square a number",
"specific_library": "math"
},
"override": True # Use prompt config instead of SDK parameters
}
}
)
print(response.choices[0].message.content)
```
```typescript theme={"system"}
import { OpenAI } from "openai";
const client = new OpenAI({
baseURL: "https://api.keywordsai.co/api",
apiKey: "YOUR_KEYWORDSAI_API_KEY",
});
const response = await client.chat.completions.create({
messages: [{ role: "user", content: "placeholder" }],
model: "gpt-4o-mini",
// @ts-expect-error
prompt: {
prompt_id: "042f5f", // Your prompt ID here
variables: {
task_description: "Square a number",
specific_library: "math"
},
override: true
}
});
console.log(response.choices[0].message.content);
```
```python theme={"system"}
import requests
def call_prompt(api_key="YOUR_KEYWORDSAI_API_KEY"):
headers = {
'Content-Type': 'application/json',
'Authorization': f'Bearer {api_key}',
}
data = {
'prompt': {
'prompt_id': '042f5f', # Your prompt ID here
'variables': {
'task_description': 'Square a number',
'specific_library': 'math'
}
}
}
response = requests.post(
'https://api.keywordsai.co/api/chat/completions',
headers=headers,
json=data
)
return response.json()
result = call_prompt()
print(result['choices'][0]['message']['content'])
```
### 6. Monitor your prompts
View your prompt usage and performance on the [Logs page](https://platform.keywordsai.co/platform/requests). You can:
* Filter logs by prompt name
* See response times and token usage
* Debug individual prompt executions
* Track prompt performance over time
 ***
***